Introduction
Lotus Notes/Domino is a widely used group collaboration and messaging platform originally designed to work in a client-server architecture using proprietary protocols. The client is known as Notes, and the server is known as Domino. Later releases of Domino incorporated the use of Internet standard protocols and provided for access to Domino servers using web browsers as well as the Notes client. This helped Domino shops meet the demand for Internet access to email and databases using a browser.
The original and still current architecture incorporates the use of key pairs based on RSA technology. The public key is stored in the Domino Directory; the private key is stored in a password protected ID file on the Notes client. This model provides robust authentication and encryption and is tightly integrated into the architecture requiring little effort on the part of the administrator to implement. However, this model is not relevant to the browser user accessing a web enabled Domino server. The purpose of this paper is to provide Domino administrators who are familiar with the client-server architecture with an understanding of authentication options and associated security characteristics for the web enabled Domino server. Specific implementation guidance for various options will be presented. This paper is based on Domino version 6.x. However, essential security-related differences between Domino 6.x and earlier versions will be explained. A brief explanation of Domino web server basics will be provided to enhance the reader's understanding of authentication options and requirements in a
Domino web server model.
Basic understanding of the traditional client-server model of Domino is assumed. Domino Web Server Basics In order to understand Domino web server authentication, it will help to first understand the basics of a Domino web server. There are three methods for serving web pages from a Domino server. First, Domino can serve web pages that are stored inside a Domino database in native Notes format. When requested by a browser, Domino will translate the Notes format into HTML and send the page to the browser via HTTP. Typically, this type of presentation would not be very attractive. The second method for serving web pages is to store HTML code inside a form in any Domino database. Using this method, the pages will be presented without translation to the browser. This allows for more options and a better looking web page. If the database will be available to both the Notes client and a browser, the developer will have to create code to detect whether a Notes client or browser is being used so the appropriate format can be presented. The third method for presenting web pages is to store HTML code in the server's file system. Using the file system to store web pages may require some additional security measures beyond what is covered in this document.
When Domino is initially installed, you will have the option to load HTTP services during the installation. This is all that is required to web enable your Domino server. If HTTP was not installed initially, you can enable the Domino web server manually by loading the HTTP task at any time. This can be done by typing "load HTTP" at the server console. To enable the web server every time Domino starts, add "HTTP" to the "ServerTasks" line in the notes.ini file. To unload HTTP, type "tell HTTP quit" at the server console, or remove the HTTP task from the notes.ini file and restart Domino.
Once the HTTP task is started, you can view Domino databases with a browser. For example, instead of clicking on the bookmark in the bookmark bar on the Notes client to open names.nsf (the Domino Directory), you would launch your browser and enter "http://SeverName.DomainName/names.nsf" in your browser's address bar. Unless the administrator had set the server and databases up to allow anonymous access, you would then be required to authenticate. Because the traditional Notes client is not being used to access the server, the familiar public/private key pair and Notes ID file will not be involved in authenticating or authorizing the user. Other methods to authenticate and authorize access to various databases will have to be used.
As a side note, the reader should understand that typically, adding the HTTP task is not all you would do to make your Domino server into a web server. A typical application might be to create an HTML file or Domino database that would serve as the default home page for your web server with links to other databases. There is a field in the server document for specifying the name of the default home page.
Authentication Model
Access to Domino using HTTP can be accomplished anonymously or by using a challenge/response security model requiring the user to know a valid user name and password. The valid user name and password must be in the primary Domino Directory or in an alternate directory. Domino supports the use of multiple directories including third party LDAP directories. Some companies may choose to store user names and passwords for browser users in a directory separate from Notes client users. The use of multiple directories is explained in the Lotus Administering the Domino System books. After authenticating, users will be authorized to access only those databases that have an Access Control List (ACL) that permits access to the authenticated user. Users who do not have a valid user name and password in the Domino directory can only access Domino web sites that permit anonymous access and can only access databases that have an ACL that permits anonymous access.
The same process for registering users to access Domino with a Notes client can be used to register users for access to Domino with a browser. Creation of the Notes ID file is optional and not needed if the Notes client will not be used. The user name that will be required for authentication will be created during the registration process. Additionally, you can select to assign an Internet or browser password during registration or assign a password later by adding a password to the "Internet password" field in the person document in the directory after the person is registered. This allows you to assign browser passwords for persons previously registered for using the Notes client only.
Management and security of Internet or browser passwords was improved in version 6.x of Domino when compared to earlier versions. Domino 5.x and earlier had no built-in ability to manage browser passwords. Domino 6.x added the ability to allow end user changing of browser passwords, assign password quality, and enforce expiration. Password history can be maintained for Notes clients, but is still not available for browser passwords. An administrator may choose to synchronize Notes and browser passwords and force an update of the browser password when the Notes password is changed. This would essentially enforce a history for the browser, but will introduce another vulnerability created by using the same password for both the Notes client and the browser.
The new password management features are implemented primarily when using a new feature in Domino 6.x called "Policies". A policy is a document created by the administrator to apply certain default settings for several administrative areas including registration and security. See Chapter 9 in Lotus Software Domino 6, Administering the Domino System, Volume1 (http://www-12.lotus.com/ldd/doc/uafiles.nsf/docs/domino6PR2/$File/adminvol1.pdf for more information about policies.
There are still significant vulnerabilities in browser password management that can be addressed with custom applications. One of the most difficult to manage risks related to browser password management is how to identify and authenticate users who call the help desk claiming to have forgotten a password. A third party application that addresses this issue is Web Set Password by PistolStar (www.pistolstar.com/websetpassword_features.html). Web Set Password allows the user to initially select a password challenge question and answer. If the user forgets his password, he can select the originally chosen challenge question from a list. If the user knows the answer to the challenge question, he can then assign a new password for himself. Additionally, Web Set Password adds other security features missing from Domino such as strike-out (locking accounts after a determined number of failed attempts to enter the correct password), disabling of password auto-complete, and logging of invalid user names and passwords that were attempted. Web Set Password also adds to Domino's ability to control password complexity by disallowing certain passwords like "password" or the user's name and checking chosen passwords against a dictionary.
Also, Lotus has made available a Domino Web Server Application Programming Interface (DSAPI) which is a C API that allows a developer to write extensions or filters for the web server allowing customization of web server authentication. For more information about the DSAPI, look for the Lotus C API Toolkit for Domino at http://www14.software.ibm.com/webapp/download/search.jsp?q=toolkit+jdbc+notessql& k=any&cat=groupware&sb=&go=y&srs=1&rs=&S_TACT=&S_CMP=&pf=&dt=&x=28 &y=8.
Password Formats
However the password is created, it is automatically hashed when it is entered in the "Internet password" field in the person document. Hashing is an encryption method that creates a one-way transformation of the data that cannot be decrypted. There are two hashing algorithms described below. The administrator must select the algorithm.
Less Secure Internet Password: The specific hash function is not publicized by Lotus. Lotus creates the hash by applying the @password function (a standard Notes function available to developers) to the text of the password. When the @password function is applied to a single text password any number of times, the result is the always the same. This leaves the "Less Secure Internet Password" format very susceptible to dictionary attacks. It would take very little skill to run the @password function against a dictionary list and compare the results to the "Internet password" field in the person document. Each match results in a discovered password. This algorithm should not be used. In Domino 5.x and prior versions, this was the default. If you are using Domino 5.x or earlier, you should change this algorithm as described below. Fortunately, Domino 6 no longer uses this as the default setting.
More Secure Internet Password: If this option is chosen, a different type of hash, known as a "salted" hash, will be used to encrypt the password. The salt is a random number that is added to the hash value and resulting in an encrypted password that is not as likely to be discovered in a dictionary attack. The administrator can follow the steps below to make sure the more secure format is used for each new registered user.
The default password format for new users can be changed by editing the "Directory Profile" for all servers. A Directory Profile is a document that is used to set up or change miscellaneous configuration settings for the Domino Directory. To access the Directory Profile and enable a more secure password format, follow the steps below. These steps are summarized here but are described in detail in the Chapter 19 in Lotus Software Domino 6, Administering the Domino System, Volume 1 (http://www-12.lotus.com/ldd/doc/uafiles.nsf/docs/domino6PR2/$File/adminvol1.pdf). All users registered after this change is made will have a more secure password
- Launch the Domino Administrator client
- Click the Configuration tab
- Click All Server Documents
- From the menu bar, choose Actions - Edit Directory Profile
- Select Yes in the Use more secure Internet passwords field
- Save and close the profile document
If you have already registered users with the less secure password format, you can easily upgrade the format to "more secure" by following the steps below.
- Launch the Domino Administrator client
- Click the People & Groups tab
- Select the persons you want to upgrade to a more secure format
- From the menu bar, choose Actions, Upgrade to More Secure Internet Password Format
- Click Yes
One consideration when using third party or custom applications to manage passwords is whether or not the application works with the more secure password format. For example, if you used an application to allow users to change a password, that application might first ask the user what the original password is. The application may use the @password function to compare what the user indicates is the original password to the password that is stored in the Domino directory. If the more secure format is in use, that particular application may not work because the value returned by the @password function would not match the stored password. So, it is important to evaluate your need for security against the ease of use when selecting the password format and selecting tools to help you manage the password. Some third party applications including Web Set Password, do handle the more secure password format.
Name Options
Another important authentication option that must be chosen is the name variations that will be permitted. This option is set on the Security tab of the relevant server document in the "Internet authentication" field. The options are described below.
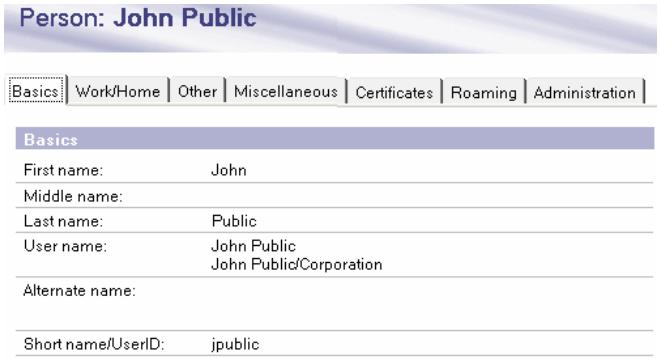
More name variations with lower security: Prior to Domino version 6.x, this setting was the default. This will allow the following variations of the username to be entered when authenticating - last name, first name, any name in the username field, hierarchical name, or short name. For example, in the sample person document below, all the following names could be used to authenticate: John, Public, John Public, John Public/Corporation (hierarchical name abbreviated), cn=John Public/o=Corporation (hierarchical name canonical) or jpublic.
The lookup actually occurs against a hidden view in the Domino directory known as the $Users view. All the name variations above from each person document in the directory comprise the $Users view in the Domino directory. Therefore, when Domino prompts the user to authenticate by entering a name and password, the user could enter "John" and whatever his password was. Domino would search the $Uses view for occurrences of "John" and check to see if the password matched. If a password match were found for "John", the authentication would be successful. This presents a problem if two persons with the first name of "John" happen to use the same password. For example, if John Public and John Doe happen to use the password "welcome", John Public could authenticate with John Doe's credentials and have access to things that only John Doe is supposed to have access to.
Fewer name variations with higher security: This is a more secure option and highly recommended over the previous option. Beginning in Domino 6.x, this is the default. Using the same name example above, only the following names entered during the authentication attempt would result in a match: John Public, John Public/Corporation or cn=John Public/o=Company. A single authentication attempt would not result in as many matches and would thus be more secure. The actual lookup when using this option is performed against the hidden $LDAPCN view.
Note: To see hidden views in the Domino Directory using the Notes client, press the
Authentication Security Levels
The challenge/response security model described so far using names and passwords can actually be deployed using different security levels.
Low Security: basic authentication or anonymous access Medium Security: session authentication and single sign-on High Security: SSL and X.509 certificate
Low Security
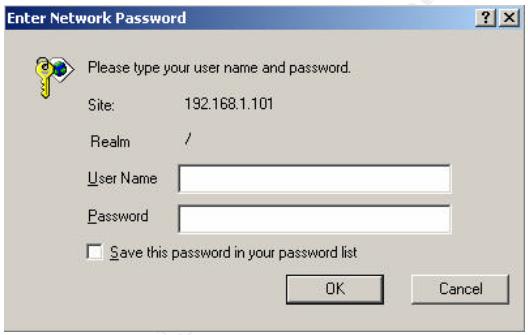
If your requirements for security are very low, you may wish to consider allowing anonymous or "basic name and password authentication" access to the Domino server. If a user requests access to a database requiring authentication, Domino sends a 401 response, "unauthenticated user". The browser will prompt the user for credentials with a generic dialog box.
Those credentials will be passed to the server in the HTTP header encoded in base64 format. For each page requested, the HTTP header containing credentials will be sent. The characteristics of basic authentication make it very insecure for the following reasons.
- Authentication credentials are repeatedly passed throughout the session making the credentials especially susceptible to network sniffing.
- The credentials are not encrypted. They are encoded, but base64 encoding is easily reversed and read.
- User names and passwords are cached on the browser side and will be remembered until the browser is shut down. Any user who leaves the browser up after providing credentials is leaving the session open for anyone else to access the server without providing credentials.
It is also important to note the "realm" against which authentication is taking place.
A realm is a text string indicating the path or directory for which a user has been authenticated. If the user requests access to a database that is not in the same directory or a subdirectory, the server will prompt the user to authenticate again. This could be quite annoying for the end user. This problem can be solved by implementing "Session Authentication" as explained later in the Medium Security section.
Enabling Basic Authentication and Anonymous
Access By default, port 80, basic name and password authentication, and anonymous access are enabled for access to Domino. When the server is originally configured, the administrator will have the option to enable or disable anonymous access to existing databases and templates. For better security, select to disable anonymous access to existing databases when initially configuring your server. This will prevent unintentional anonymous access to important databases that are included by default such as the directory and log files. You can always go back and add anonymous access as necessary to individual databases.
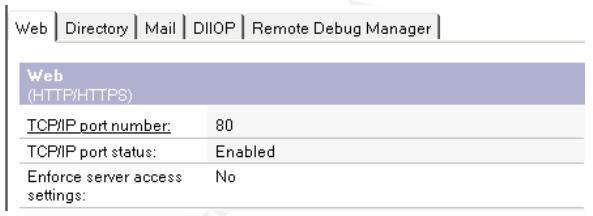
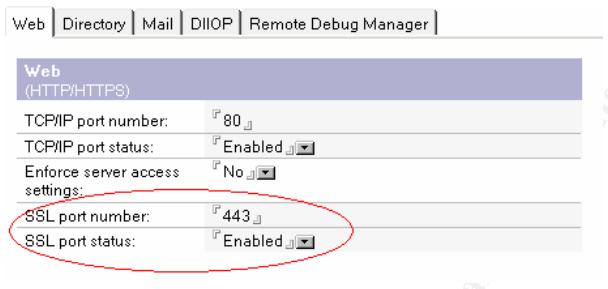
The setting for port 80 can be viewed and edited in the server document of the Domino directory on the Ports-Internet Ports-Web tab.
The settings for basic name and password authentication and anonymous access to the server can be found on the Security tab of the Internet Sites document in the Domino directory. This document is new to version 6.x of the Domino server. Many of the settings now found in the Internet Sites document of the Domino 6.x server were formerly found on the Ports-Internet Ports-Web tab of the server document. (By default, the settings in the Internet Sites document apply to all servers in the Domino domain.) The following screen shot displays anonymous and basic authentication settings on the Internet Sites document
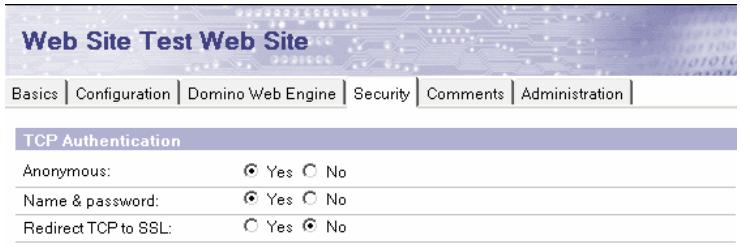
If you want to completely disable anonymous access to the servers in the Domino domain, change the anonymous field in this section of the Internet Sites document to "No".
The Domino domain web servers can be set up to allow anonymous connections only to particular databases. For this to work, leave anonymous access set to "Yes" in the Internet Sites document and permit or deny anonymous access to particular databases by using an Access Control List (ACL).
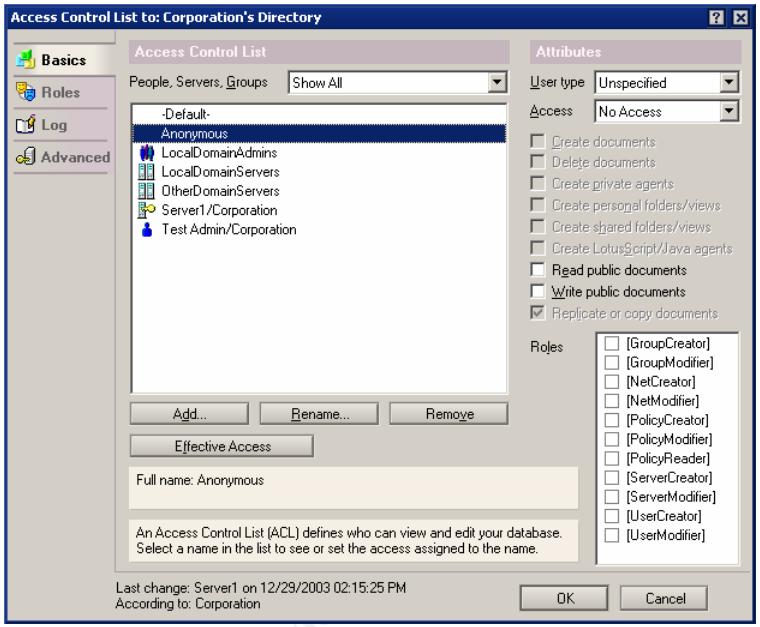
The screen shot below displays the ACL on a Domino database. This ACL does not allow anonymous access. If a user tries to access this database with a browser, the user will be prompted to authenticate. It is important to note that if you do not have the "Anonymous" keyword in the ACL, anonymous users will have whatever access the "Default" user has. If allowing anonymous access to the server, it is very important to review the ACL's on all databases for anonymous and default keywords to ensure anonymous access is only permitted as intended.
Medium Security
A feature called "Session Authentication" can be enabled per each single server or for multiple servers. Session Authentication provides an increased level of security over basic authentication for several reasons. When Session Authentication is enabled, the user is presented with a logon form similar to the display below
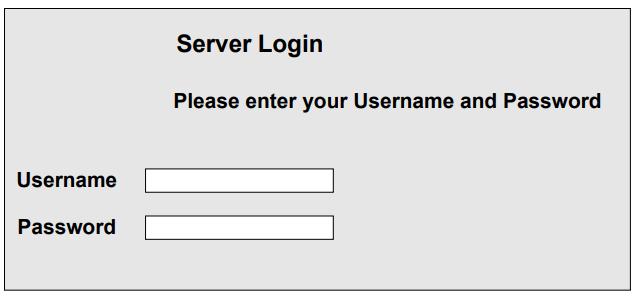
This basic logon form can be found in a database called "domcfg.nsf". This database can easily be created from a template provided with the Domino server. The logon form can easily be modified to allow for company branding, addition of banners, or customized error messages. For more information about creating domcfg.nsf and customizing the logon form, see Chapter 42, in Lotus Software, Domino 6, Administering Domino System, Volume2 (http://www-12.lotus.com/ldd/doc/uafiles.nsf/docs/domino6PR2/$File/adminvol2.pdf). Once the user enters proper credentials into the logon form, Domino encrypts the password and stores it in a cookie, and the cookie is used for subsequent access. The following aspects of session authentication additionally enhance security and provide ease of use.
- The server has knowledge of who is using the server so you can get a listing of active users. To see such a list, just access the server console and type "tell http show users".
- Because the server is maintaining state with a cookie and has knowledge of user activity, sessions can be timed out after a specified period of inactivity. The cookie is simply set to expire after a specified period of time. The administrator can configure the timeout as described below.
- A developer can easily create a logout button. Users can click the logout button to destroy the server side-state and clear the session without closing the browser.
- The credentials are only passed to the server in clear text when initially entered, reducing the likelihood that credentials will be sniffed. (Please read "Important Tip" in the High Security section for information about encrypting credentials.)
- Security policy banners can be appropriately displayed.
To enable session authentication, open the Internet Sites document and select the Domino Web Engine tab. Change the Session authentication field from "disabled" to "Single Server". You can also set the "Idle session timeout" here. The default timeout value is 30 minutes. (Note: Basic Authentication as described above must remain enabled for Session Authentication to work.)
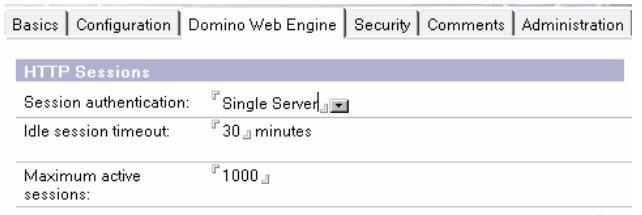
Single Sign-On (SSO) is a special implementation of Session Authentication that allows the user to enter a name and password one time only for access to any server configured to participate in the SSO domain. To enable SSO, change the Session Authentication field displayed above to "Multiple Servers".
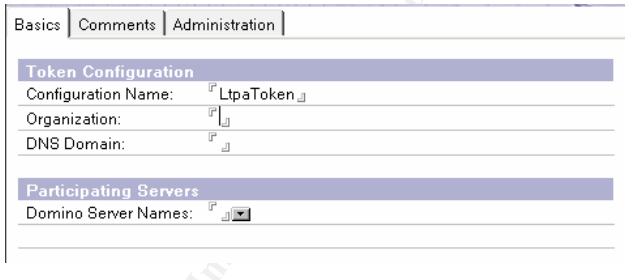
Additionally, a special document called "Web SSO Configuration" must be created when implementing SSO. To create this document, select the Servers view in the Domino directory. Then from the Menu bar, select "Web - Create Web SSO Configuration". This document is displayed below. You must enter the organization name, DNS domain name, and a list of participating servers.
High Security
For maximum security, consider enabling Secure Sockets Layer (SSL) protocol. SSL is a security protocol that can provide a higher level of security for basic or session-based authentication. SSL can also be used to increase the security of anonymous connections by requiring client authentication. Additionally, SSL can provide confidentiality and integrity. Domino supports SSL and uses industry standard X.509 certificates in its implementation.
SSL consists of two sub-protocols, the SSL record protocol and the SSL handshake. The SSL record protocol specifies the format of messages exchanged between the client and the server. The format includes a message digest, created using the MD5 algorithm, to ensure that messages are not altered, thus providing integrity. During the SSL handshake, the client and server can authenticate each other using certificates and public keys. Also during the handshake, the client and server cooperate to create symmetric keys for the session used to perform encryption that provides confidentiality. (Introduction to SSL).
SSL Authentication
An essential step in implementing SSL is to obtain signed certificate from a Certificate Authority (CA). Initially, a certificate request is issued by the subject (client or server) and submitted to the CA for verification and signing. A Certificate Authority is (usually) a third party organization that signs and issues unique digital certificates to company or individual. The CA performs a background check to confirm the identity of the certificate requestor. The background check for companies is typically more thorough than the check done for individuals. Once the background check is completed, a Certificate containing a serial number and information about the CA and the subject (server or individual requesting the certificate) is signed and issued by the CA. The Certificate is installed as appropriate on the server or the browser client.
Exactly how does server authentication occur, and why does it matter? If a browser has a trusted or root certificate signed by the same Certificate Authority (CA) that signed the server certificate issued by the CA, then the client can be sure the server is who it says it is. This prevents a third party machine from spoofing the machine that you intended to connect to. That could be critical, for instance, if you were sending a credit card number to a bank's web server. You would want to be certain you were sending the credit card number to the bank's server and not an imposter.
You may also want the server to authenticate the client. This would help you to confirm that the browser is the browser you were expecting. In this case, the browser would have to have the certificate signed by a trusted CA. The server would have to have a root certificate from the same CA.
So, exactly how do you obtain a signed Certificate from a CA for your Domino server? There is a special process you must follow to get the certificates signed by the CA. That process, beginning with the selection of a Certificate Authority, will be discussed after a brief explanation of how to enable SSL on your Domino server.
Where do root certificates come from? Browsers and Domino servers come with many root certificates pre-installed. If the root certificate for the CA you choose is not pre-installed, you will have to obtain and install the root certificate.
Enabling SSL on Domino
You can enable SSL for the entire server, or for any particular database. First you must activate the SSL port in the server document. This is done on the Ports - Internet Ports - Web tab of the server document.
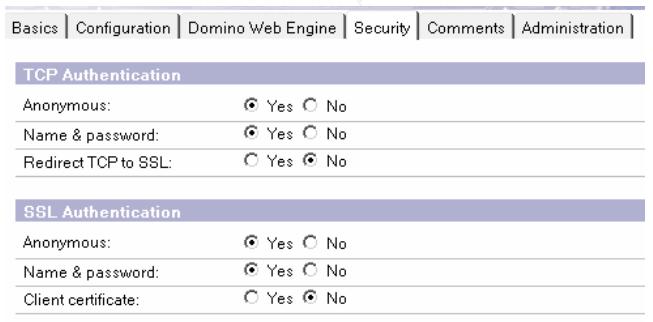
Next, open Security tab on the Internet Sites document to further define how SSL will be used. On this document, you can enforce all TCP connections to use SSL by selecting "Yes" in the "Redirect TCP to SSL" field. Further, you can specify whether anonymous or name and password authentication will be accepted for SSL connections and whether client authentication will be used.
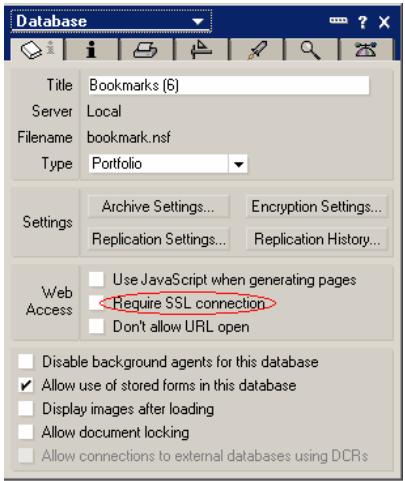
If you choose not to enforce SSL for all connections, you can maintain the flexibility to enforce SSL on specified databases only. To enforce SSL on a specific database, edit the database properties and check the "Web access: Require SSL connection" box.
Important Tip! You can require SSL connection on the domcfg.nsf file discussed in the section on Medium Security to force the initial submission of authentication credentials to be encrypted.
Choosing A Certificate Authority
There are several commonly used Certificate Authorities to choose from. Browsers come with certain preinstalled trusted root certificates for commonly used CA's. It will simplify SSL implementation if you use one of these same CA's. Two commonly used third party CA's are Thawte, http://www.thawte.com, and Verisign, http://www.verisign.com. There are several others as well. After preparing the Domino server to request and store certificates, you can send a certificate request to the CA to obtain a signed certificate. The procedures for doing this may vary some; it depends on your CA. Directions for requesting the certificate can be found on your CA's web site. The CA will charge you an annual fee for this certificate. When requesting a server certificate, the CA will request that you provide information needed to verify your corporate identity
Domino uses the standard Public-Key Cryptography Standards (PKCS) format for certificates. Make sure the CA that you choose, uses this format. Then you must prepare the Domino server to request the certificate and install the appropriate signed certificate.
The following procedures explain the steps involved when using a third party certificate authority. Domino could serve as it's own Certificate Authority.
However, this may complicate things for your end user. If Domino is the CA, each end user will have to install Domino's root certificate in their browser. This could be a great inconvenience over relying on preinstalled certificates. For more information about setting up Domino as a Certificate Authority, see Chapter 45 in the Lotus Software, Domino 6, Administering the Domino System, Volume 2 (http://www-12.lotus.com/ldd/doc/uafiles.nsf/docs/domino6PR2/$File/adminvol2.pdf).
Setting Up the Domino Server to Use SSL Certificates
The following steps were excerpted from pages 46-1 through 46-10 in Lotus Software, Domino 6, Administering the Domino System, Volume 2 (http://www12.lotus.com/ldd/doc/uafiles.nsf/docs/domino6PR2/$File/adminvol2.pdf) and e-Pro Magazine article, "Domino Internet Security: Implementing SSL and X.509" http://www.epromag.com/eparchive/index.cfm?fuseaction=viewarticle&ContentID=500&websiteid=). The steps were simplified and condensed to include elements necessary for most implementations according to the author's actual experience in implementing SSL.
Step 1: Preparing the Server Certificate Admin Application A special database, CERTSRV.NSF, should have been created during server setup. If this database is not on your server, you must create it using the CSRV50.NTF template. This database is the Server Certificate Administration application. This application must be used to request a CA signed certificate, add a predefined certificates as trusted roots, and merge signed certificates into the a special file called the keyring file. Be sure the review the ACL for the CERTSRV.NSF database to limit access appropriately.
Step 2: Create server keyring file The second step in preparing the Domino server is to create the keyring file that will store the signed certificate. You have to do this no matter which CA you use. During the process of creating a keyring file, the unsigned certificate is created. Using a Notes client, open the Server Certificate Administration database on the server, select "Create Keyring" and enter data as follows: · keyring file name: Enter the name of the key ring file. The default is keyfile.kyr. If you change this name, you will have to enter the new name on the Internet Sites document.
- common name: Enter the fully qualified domain name of the server. This and the following entries must match with the information you may have already provided to the CA during your initial corporate records review.
- key size: 512 is the default. Enter 1024 for more secure encryption.
- password: Enter a strong password for the keyring.
- organization: Enter your company name.
- organizational unit: (Optional) - Enter division or department.
- Locality: Enter city or town where your company is registered to do business.
- State: Enter state where your company is registered to do business.
- Country: Enter country where your company is registered to business.
After you have verified the information you entered, click "Create Keyring". The keyring file and a "stash" file (file type "sth") holding the keyring password will be created in the Notes\data directory on the Notes client. Copy these files to the Domino\data directory on the server.
Step 3: Merge a CA certificate as a trusted root This step may not be necessary for your CA. It depends on whether or not Domino already has a trusted root for the CA that you chose. Domino includes several trusted root certificates for VeriSign and others. You can view the list of already installed root certificates by selecting the "View and Edit Keyrings" view in the Server Certificate Administration database. If your CA's root certificate is not present, instructions similar to the following can be used to obtain and install a root certificate.
- Browse to the CA's web site and look for the "trusted root".
- Copy the trusted root certificate information to a notepad file (cert.txt).
- Open the Server Certificate Administration database.
- Click "Install Trusted Root Certificate" into Key Ring.
- Enter the name of the keyring file (use the default name, keyfile.kyr).
- Enter the name used to identify the certificate: (eg., name of your CA)
- Paste the contents of the notepad file (cert.txt) into the provided field.
- Click "Merge Trusted Root Certificate into Key Ring".
- Enter password for keyring file and click OK.
Issue Request for Signed Certificate
Now you can actually request a signed certificate that will have to be merged into the keyring file. Issue the request from the Server Certificate Administration database on the Domino server. From the Server Certificate Administration database, click Create "Certificate Request". Complete the following fields.
- key ring file name: x:\domino\data\keyfile.kyr (x: = drive containing Domino\data directory). · Log certificate request: yes
- Method: paste
- Click "Create Certificate Request"
- Copy the certificate to a notepad file, server_request.txt. This is your Certificate Request.
- Save the notepad file.
The following instructions will not be as specific as those above because the exact remaining steps for requesting your certificate will depend on CA that you have chosen.
- Go to CA's web site to request the certificate.
- Follow instructions for requesting a certificate for Lotus Notes - you will have to paste your Certificate Request (the contents of the notepad file, server_request.txt, created above) during the certificate request process. This is the certificate that will be signed.
- You will receive an email from the CA telling you your certificate is ready. This message will tell you how to pick up the certificate or may send the certificate to you.
- Copy the certificate into a notepad file, server_signed.txt.
- Merge the signed certificate into the keyring file
- Open the Server Certificate Administration database
- Click "Install Certificate into Key Ring"
- Paste the contents of the server_signed.txt file into the form that is presented
- Click "Merge Certificate into Key Ring"
That completes the process for installing a signed certificate on you Domino server. You are now ready to provide server authentication, encryption, and data integrity for clients accessing your Domino web server. If you have the need to provide client authentication, you should follow instructions for the browser you are using to initiate a certificate request. These instructions should be available at your browser's web site.
As you can see, the options for authentication and method for enabling encryption when using a browser are quite different from using a Notes client. The need for security must be evaluated against ease of use for the end user and management of the server and users from an administrator's perspective. With the increasing demand for access to mail and company Intranets from the Internet, a Domino administrator is likely to face these decisions. Hopefully, the information in this paper will assist the administrator with making these decisions.
Ngày: 30/4/2020 - đăng bởi: Nguyen Van Dat